New World Leveling Guide - Questing - Part 1
General efficiency tips and how to level through the first 2 territories of New World as smoothly as possible (with maps), to set you up for success in the rest of Aeternum and the Main Story.
Leveling by questing is my favorite method of getting XP in New World. The guide below describes the method I’ve found that is the most efficient, limiting excessive fast travel/azoth costs, along with keeping things interesting and exploring the beautiful world of Aeternum. This method also results in being “overleveled” for the areas you’ll travel to, making soloing/small parties easier. It will mostly appeal to the "PvE" style of player, but can be used by anyone.
In Part 1 of this guide, we cover the Watchtower (starting beach), Windsward, and First Light.
Note: this guide skips "specialized" quests, such as housing quests or weapon-specific quests, but feel free to add them in per your personal preference! I'll try to keep it updated to new and updated quests as well, but roll with the punches! If it looks like I missed a new piece, feel free to let me know or just incorporate it in to your adventure.
The Basics
This guide follows the following basic principles.
- The most important first: don't do any of this if it means you're not having fun. Change it up! The point is to enjoy yourself.
- Take every quest you see. Don’t skip any of them! Your Journal does not have a cap, just take them all.
- This includes Town Projects and Faction Missions (that apply to your questing area and plans - don't seek the targets out, they should be in your path already). Town Projects for Hemp, Rawhide, Water, Green Wood, Rations, and beasts are always great choices.
Town Projects that ask for hundreds of ![]() Madeira Verde usually aren't worth the time. Stick to lower amounts.
Madeira Verde usually aren't worth the time. Stick to lower amounts.
- Don’t travel to a new area just because one quest opened up there. Hold out until there are several, if you.
- Read every lore page you find. XP gained from each page increases as you read more of them. It adds up!
- As you travel the wilderness, mine and harvest and skin as much as you can stand. You get decent character XP for doing this, and it adds up. Also, you won’t regret having a head start on those gathering skill levels. If your inventory and storage shed get too full, sell them on the Trading Post, even if it’s for a cheap price. You’ll get plenty more.
- Kill everything you aggro. It's added XP, doesn't take that long, and it also helps avoid training mobs on people (which is just a super cool thing to not do).
- For solo players: my favorite weapon combo is a Sword/Shield with Life Staff, with heavy armor. To me, the survivability of blocking, along with heals, is unbeatable. I put an Amber gem into my swords and spec 50/50 into Focus and Constitution. But, it doesn't work for everyone. Do what feels right to you.
You may have inventory problems if you also do logging and mining of boulders. Have a backup plan for these items if you plan on doing them.
- Be sure to keep an eye on your inventory and unload to your shed in town whenever you need to. If you don’t want to keep your stuff in the town you started in, you’ll get a couple opportunities to move it all for free, or cheap.
- Save your Coin. Don’t buy from the Trading Post unless you really need an upgrade and haven’t found one naturally from drops. You’ll want to save as much as you can for buying a house as soon as possible.
Starting Beach/Watchtower Quests
Wherever you wash up, the quests are more or less the same. Kill some Drowned, find some lore pages, kill a boar, make some food, clear a Corrupted cave, head to town.
- Salvage weapons and armor you don’t plan on using.
- Don’t repair your gear. You’re going to be going through new pieces so fast that you should only repair if they break completely and you have no replacement, to preserve your Repair Parts.
On the way to town, don’t forget to quickly accept and complete the quest from Hapless Howe, and turn it into them in town.
Settlement Introductions
- Grab every quest you see, and continue following that “starter” questline.
- Check the Town Project Board each time you’re in town, but only accept items that you will realistically do.
For example, if you’re in a territory with lots of Rabbits, grab the “Cull Rabbits” quest and do it as you do other quests. Explore & Find quests are always good, but watch for areas that are much higher level than you, or areas you won’t visit in your questing route.
- Before Choosing a Faction: When you’re on the quest called New Alliances, you’re asked to talk to the 3 faction leaders. But, you can actually do this in any settlement. So, if you’re wanting to switch settlements (either to play with friends or you just like it better), do it now! Just make the run, it won’t take long. Be sure to use the roads for slightly increased movement speed. Then, in the new town, speak to the 3 faction leaders. This will switch you over seamlessly.
Note: I recommend moving to Windsward. I know Everfall is popular, but the next section of this guide describes how starting in Windsward makes progressing the Main Story much simpler.
- After choosing your faction, go out of your way to do the Initiation quest, and complete the first Faction Mission you’re required to take to complete the faction introduction. This allows you to begin checking the Faction Mission board when you’re in town too.
- Grab whatever you can, but stick to PvE only unless you know for sure you’ll be safe doing PvP (getting killed isn’t efficient XP, and there’s most likely lots of high levels flagged around looking for low levels to smack).
- When you get asked to make an Iron Longsword, make another weapon or shield too. You only need one to finish the quest, and the free Iron Ore can’t be beat, and it will probably be a better weapon than what you found on the beach.
- The introductory quests end with “Encroaching Corruption” (where you get asked to kill a few small corrupted areas around the territory), which is just after “Commitment to the Cause”. Completing Commitment to the Cause (which is done by doing one quest and one mission for your chosen faction) unlocks a world of Side Stories (side quests).
Following the basic principles of this guide so far will get you far in your questing adventures. But, for a more specific guide on the questing flow that I like to follow for the first 4 territories, that keeps you over-leveled and ready for anything, while staying engaged with the game, keep reading.
Quest Routes by Territory
My personal preference is to quest in Windsward, then Monarch’s Bluffs, then Everfall, then First Light. This lines up best with the Main Story and has numerous other advantages. To follow this guide, move to Windsward during the [quest_0402_0202_introtoallfactions] or [quest_0409_0103_timetochoose] quests.
Don't forget to keep gathering! Skin beasts, harvest Magical Plants, Herbs and Hemp, and mine nodes! Dump them in storage when you return to town. Be sure to ready those glowing blue lore pages too. (You can just interact with them quickly for the XP - but I do recommend reading them. They add depth and lore to the world, and it enhances your experience.)
As you follow the maps below, don't be afraid to branch off the path a bit to complete any Town Projects or Faction Missions you may have accepted, but don't veer too far off.
Windsward
Set your Inn in Windsward. Accept the first 3 side stories: [quest_0610_0101_apricklyrequest], [quest_0604_0203_abominableluck], and [quest_0605_0301_soiledexpectations] from the NPCs inside Windsward.
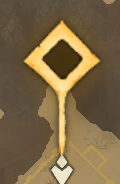
Tip: look on the map and compass for the icon below to locate quests that are available for you to accept.
Accept any available Town Projects involving rabbits, wolves, turkeys, or rawhide/hemp (100 or less). Accept Town Projects or Faction Missions for Cooper's Ranch, Bullrush Wash, or Merrill's Place. Leave town through the west gate.
If you have [quest_0604_0501_encroachingcorruption] still, you can swing by the red stars to complete that as well, while you're in these areas (see red stars on map).
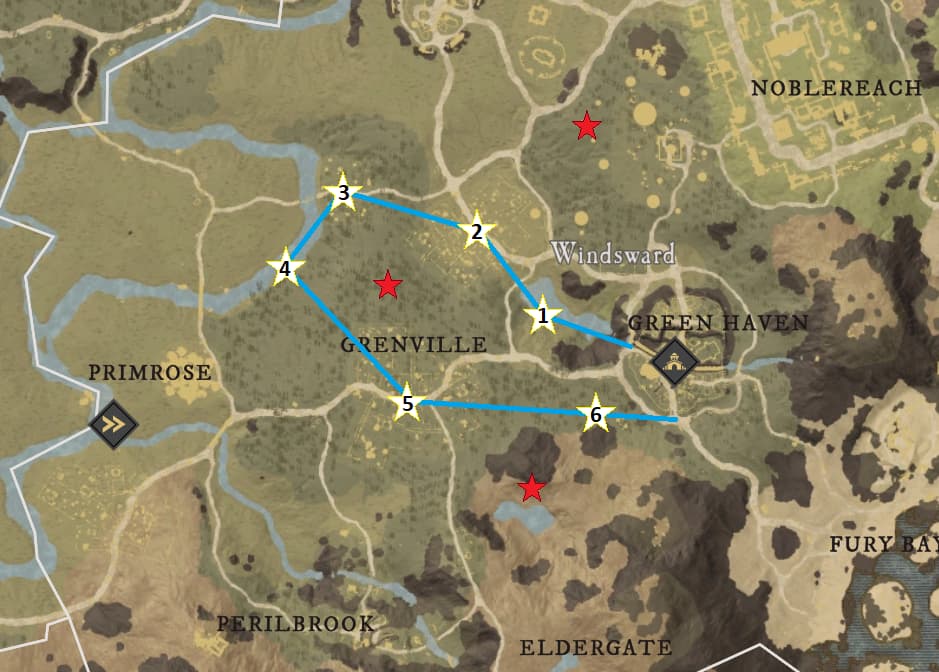
- Stop by Michael Shields and quickly complete [quest_0623_0101_fq01] and [quest_0623_0102_fq02]. Save [quest_0423_0101_fq03] for later.
- Move northwest to Merrill's Farm and collect the
 Solo de Merrill from the glowing points, and grab the lore pages. Kill any turkey you see - you need to skin 6 for the
  Peru Depenado.
 - Head west to Bullrush Wash, and keep an eye out for rabbits - you need to skin 3 for the
 Coelho Esfolado. Kill the Abominations needed for [quest_0604_0203_abominableluck].
 - Swing by the river's edge for your 8
 Galhos de Silvado. Follow the river further if needed for more. Also watch for rabbits if you still need some. Lots of Hemp and Herbs here too!
 - Run southwest to Cooper's Ranch and collect the
 Solo de Cooper.
 - Start heading back to Windsward's south gate, and swing by here for more turkeys if you're still short.
Pop into town and turn everything in, accepting all new quests in each chain. You should gain [quest_0604_0202_buildingblocks], [quest_0610_0103_thelonelyharvest], and [quest_0603_0302_predatorprey]. You'll also probably pick up [quest_0622_1501_intrototravel], but hang onto it for now. We'll do this later. Accept any available Town Projects involving rabbits, wolves, turkeys, elks, or rawhide (100 or less). Accept Town Projects or Faction Missions for Harplass Homestead, Moe's Farm, or Forellac. This one is a bit of a long run, but a quick Inn teleport back.
Hang onto [quest_0604_0202_buildingblocks] for a bit, but mine 200 ![]() Pedra from Boulders when you're able, then refine into 50
Pedra from Boulders when you're able, then refine into 50 ![]() Bloco de Pedra at the Stonecutting Station. Keep them in your inventory if you can so you don't accidentally leave them behind. You can use Ctrl+Left Click to split (drag the split stack into storage).
Bloco de Pedra at the Stonecutting Station. Keep them in your inventory if you can so you don't accidentally leave them behind. You can use Ctrl+Left Click to split (drag the split stack into storage).
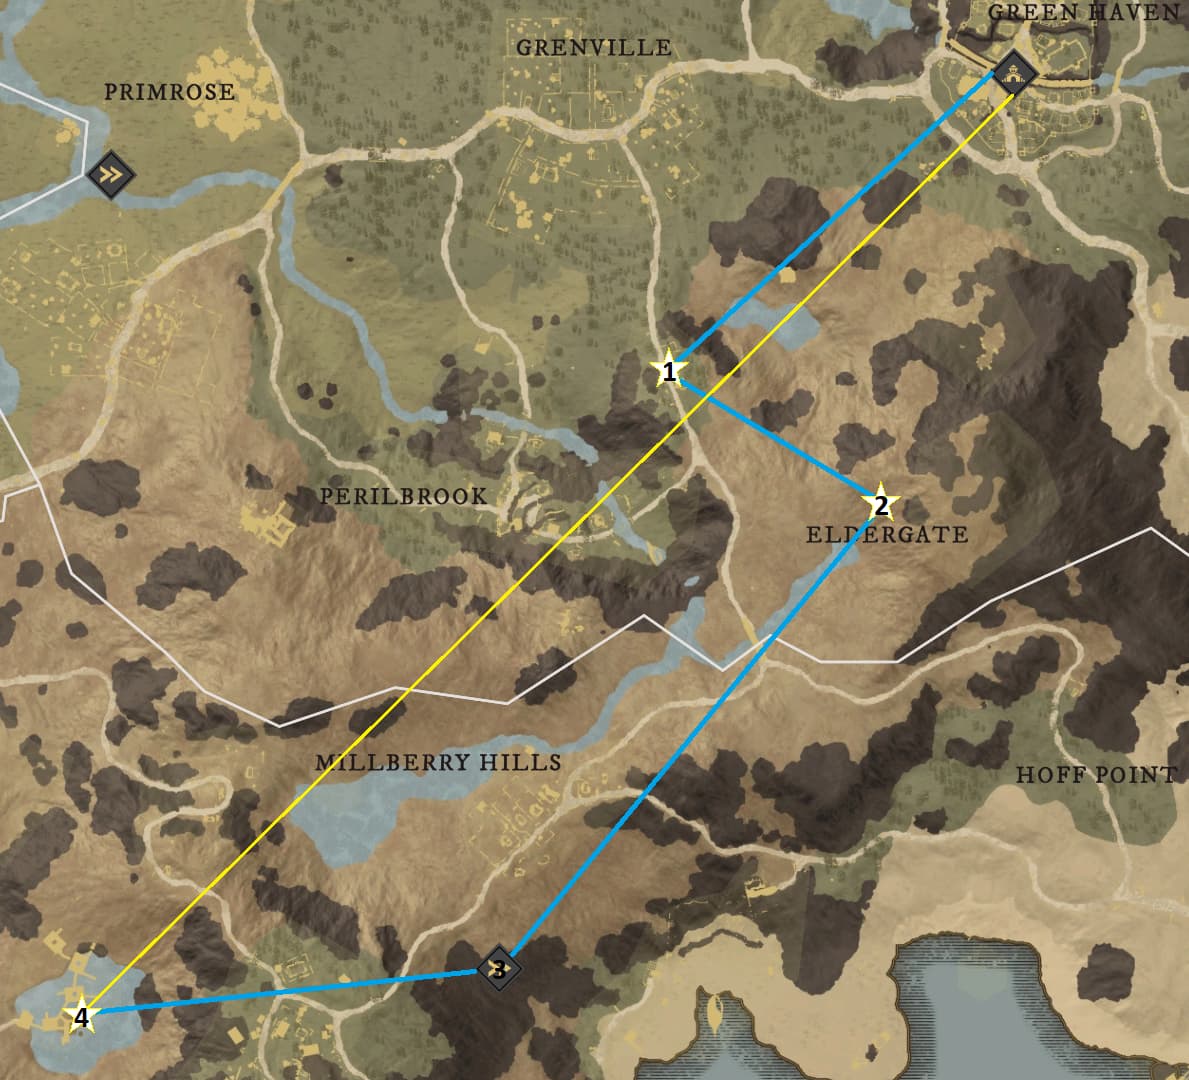
- Run southwest to Moe's Farm and collect the
 Caixa de Milho and
  Cesta de Morangos items from the chests there. Kill the abomination near the Provisions Crate.
 - Run southeast to Eldergate, and kill the male (horned) Elk for
 Galhadas de Cervo Majestosas and Puma to complete [quest_0603_0302_predatorprey]. Tip: sneak up behind the Elk and it will not run away. Use all your abilities on a melee weapon to kill it quickly. Switch to a ranged weapon if needed to finish it off.
 - It's a little bit out of the way, but worth it. Head south into First Light, and swing by Las Torres Lookout (Spirit Shrine south of Campbell's Rest) to unlock it.
- Head west to Forellac. Gather
 Truta de Forellac Fresca from the Fish Traps, and use your Inn to travel back to Windsward (open the Map, hover over Windsward, select the Inn).
Turn everything in, accepting all new quests in each chain. You should gain [quest_0610_0102_piratesofspice], and [quest_0602_0503_warpandweft]. You'll hang onto Warp and Weft for now, we'll complete it later. Accept any available Town Projects involving rabbits, wolves, turkeys, or rawhide/hemp (100 or less). Accept Town Projects or Faction Missions for Scratchrock Burrow, Moe's Farm, Buccaneer Creek, or Buccaneer Falls.
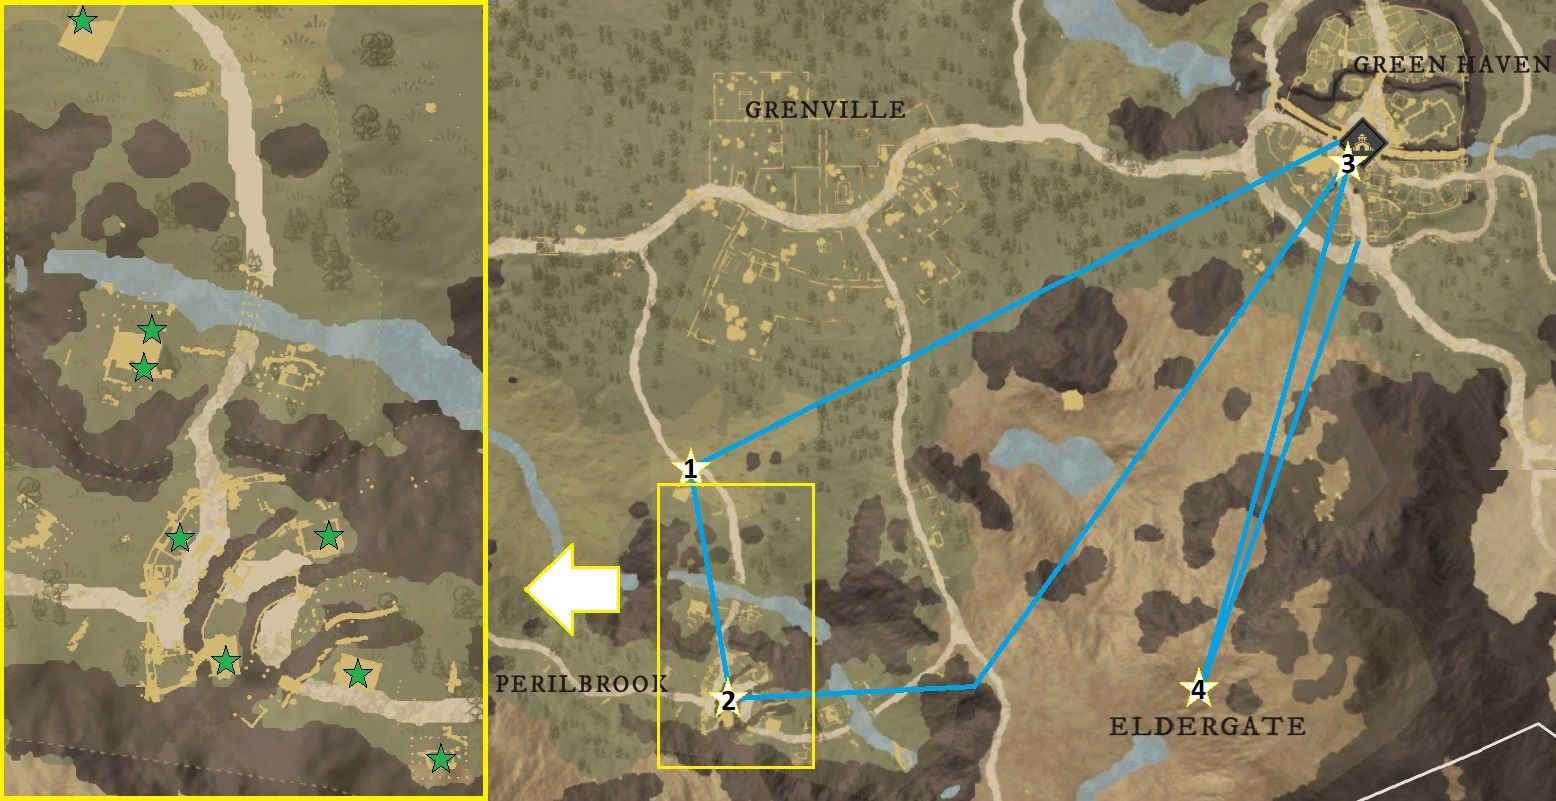
- Run southwest to Buccaneer Creek. Don't skip the opportunities to gather (mostly Hemp, Iron) on the way if you're able to. Gather 1
 Açafrão Roubado (northernmost house), then head south across the river (still in Buccaneer Creek), and grab 1
  Pimentas Roubadas (first floor) and another
  Açafrão Roubado (second floor).
 - Continue south into Buccaneer Falls and gather the lore page and the remaining 5 stolen spices, killing pirates as you go. See map above. Watch out for Miklos Dauti on the second floor of the largest house.
- Head back to Windsward and pick up [quest_0603_0204_bearscratchrock].
- Run south of town and complete it. You'll follow clues from near the pond up the hill to the bear cave, where you'll defeat Scratchy. Be careful, he's level 16 and hits hard. Enlist help from nearby players if needed. When done, return to Windsward.
Turn everything in, accepting all new quests. You should have [quest_0603_0301_makingsparks], [quest_0605_0401_jarofblackbile], and [quest_0610_0201_shotacrossbow_p1] (another we'll do later). Accept any available Town Projects involving rabbits, wolves, turkeys, or rawhide/hemp (100 or less). Accept Town Projects or Faction Missions for Harplass Homestead or Willette's Homestead.
Note: the quests ahead can be a bit challenging solo, depending on your level. If needed, grab a few extra Town Projects or Faction Missions to gain a few levels, or enlist the help of a buddy. The good news is, this is the last time in the 4 starting territories that quests should be tough, because after Windsward, you'll be over-leveled for the other 3 starter territories!
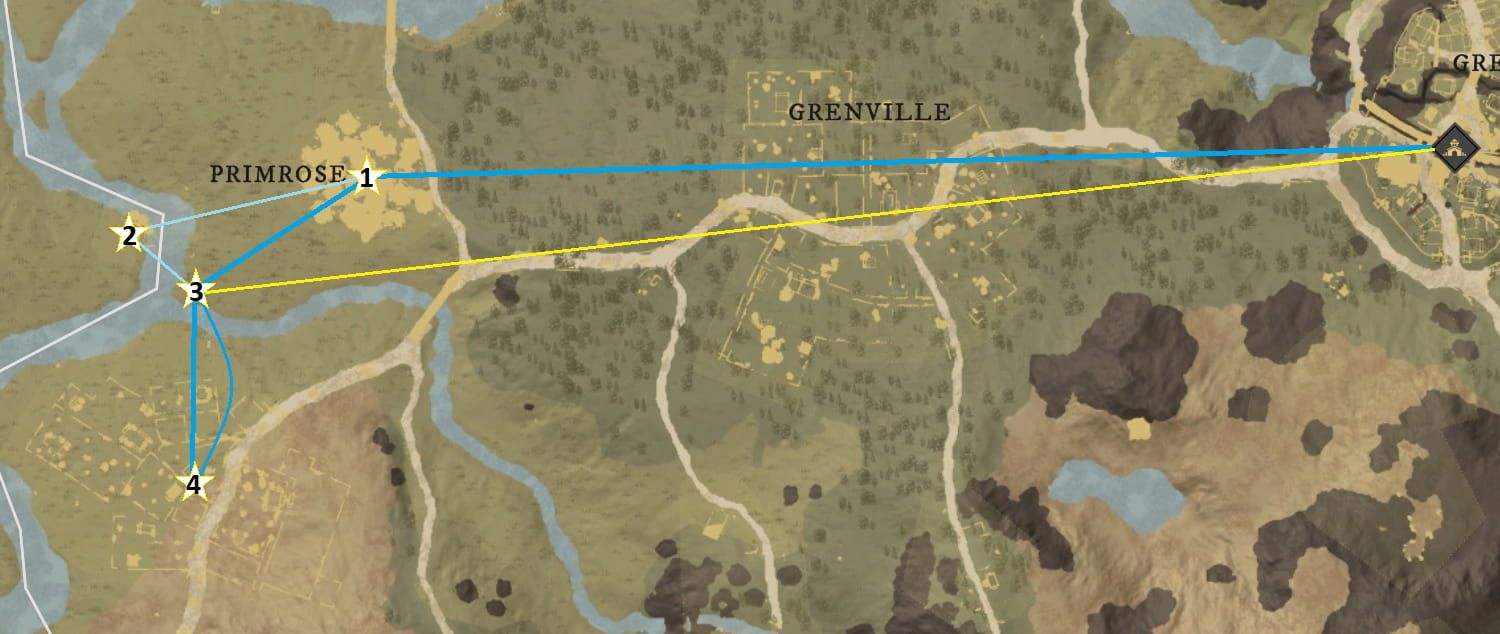
- Head straight west to Harplass Homestead. You can even use the Fisherman's Bend Spirit Shrine to get there quickly if you're on [quest_0604_0799_thehermitww] and have the Azoth. Collect the
 Resíduo da Corrupçãos from enemies there (stick to the edges - the Plainsblot Cultists in the inner sections may be too difficult for you at this point).
 - If you're level 12, swing by Fisherman's Bend and talk to [npc_9901_msq_yonas] to advance the Main Story a bit, but we won't be continuing this quest line in this guide until we're done in Windsward. If you're not level 12, do it when you are!
- While near the river, gather the
 Fragmento de Cascalho and
  Cabeça de Junco items you need.
 - Run south to Willette's Homestead, killing Withered to collect the
 Ponta de Aço items. Return north to the Spirit Shrine to fast travel back to Windsward.
Turn in your quests, and pick up [quest_0605_0501_azothfulminate] and [quest_0604_0201_stevenexpedition]. There's not much else to multitask with this time (unless you haven't talked to Yonas yet to receive [quest_9901_0008_oldstoneremembers_v2]), so just use the Spirit Shrine again to head to Harplass Homestead, quickly complete that quest (place the ![]() Protótipo de Bomba de Azoths around the area), and head back to Windsward (no map this time).
Protótipo de Bomba de Azoths around the area), and head back to Windsward (no map this time).
Now, onto First Light! We'll come back for those 23+ quests ([quest_0604_0201_stevenexpedition] and [quest_0610_0201_shotacrossbow_p1] later.
First Light
Before you go, grab your 50 Stone Blocks for [quest_0604_0202_buildingblocks]. If you started in First Light, you can fast travel from Windsward to First Light settlement. Otherwise, fast travel the rest of the way to First Light from the Spirit Shrine in the northern part of the territory you picked up earlier, and run the rest of the way. Either way, set your Inn to First Light when you arrive, and turn in [quest_0604_0202_buildingblocks].
Pick up quests [quest_0910_0101_laidtorest] and [quest_0903_0301_avoidopenflame]. Accept any available Town Projects involving rabbits, wolves, or rawhide/hemp (100 or less). Accept Town Projects or Faction Missions for Dayspring Mills.
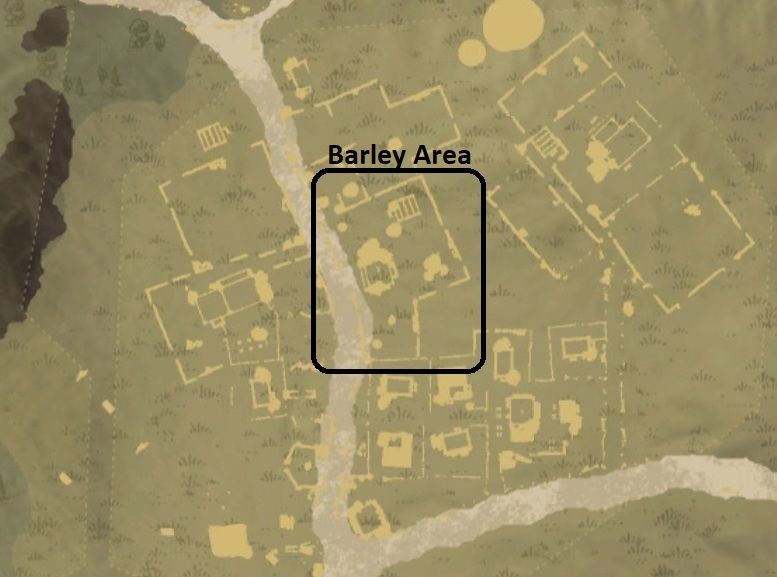
Head north into Dayspring Mills and complete the two quests there. The ![]() Barril de Pólvoras can be found all over the area (look for small, glowing red barrels), and the
Barril de Pólvoras can be found all over the area (look for small, glowing red barrels), and the ![]() Cevada da Aurora can be found in the area in the map shown above. Return to First Light by foot.
Cevada da Aurora can be found in the area in the map shown above. Return to First Light by foot.
Turn in the 2 quests, and pick up [quest_0910_0102_distillation], [quest_0904_0201_minerrequisition], and [quest_0905_0302_theoryoldworld]. Accept any available Town Projects involving boars, rabbits, wolves, or rawhide/hemp (100 or less). Accept Town Projects or Faction Missions for Hilltop Encampment or Letum's Pick.
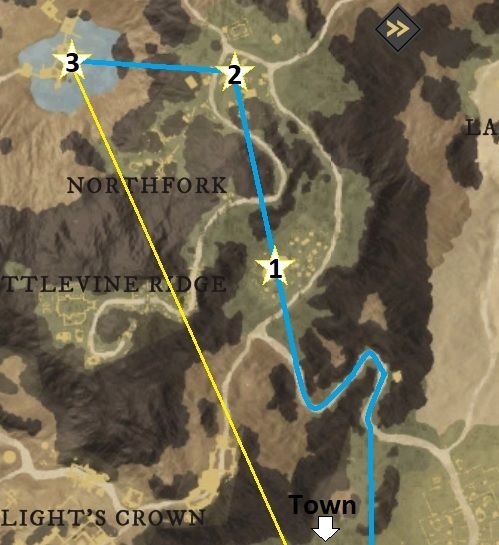
- Run north from First Light, up the winding path, to Hilltop Encampment. Gather the
 Saco de Lúpulo da Colina items, and kill Chefe de Cozinha Paul Giroux (he's in the large tent).
 - Hear further north to Letum's Pick and kill Corrupted for
 Lotes de Carvão and your 10 needed kills, and gather the
  Pedaço de Magnetitas.
 - Veer west to Forellac, and gather the
 Peixe Seco from the Fish Traps. Use your inn (if it's off cooldown) to return to First Light. Running back doesn't take too long either, as you can just fall off various cliffs to get back to town fairly quickly.
Turn everything in, and accept [quest_0905_0301_evolutioncorruption_pt1], [quest_0902_0501_discardedmemories], and [quest_0904_0301_muzzleorthrus] (we'll hang onto this one for bit). Accept any available Town Projects involving boars, rabbits, wolves, turkeys, or rawhide/hemp (100 or less). Accept Town Projects or Faction Missions for Hilltop Encampment, Campbell's Rest, and Clearwater Bend.
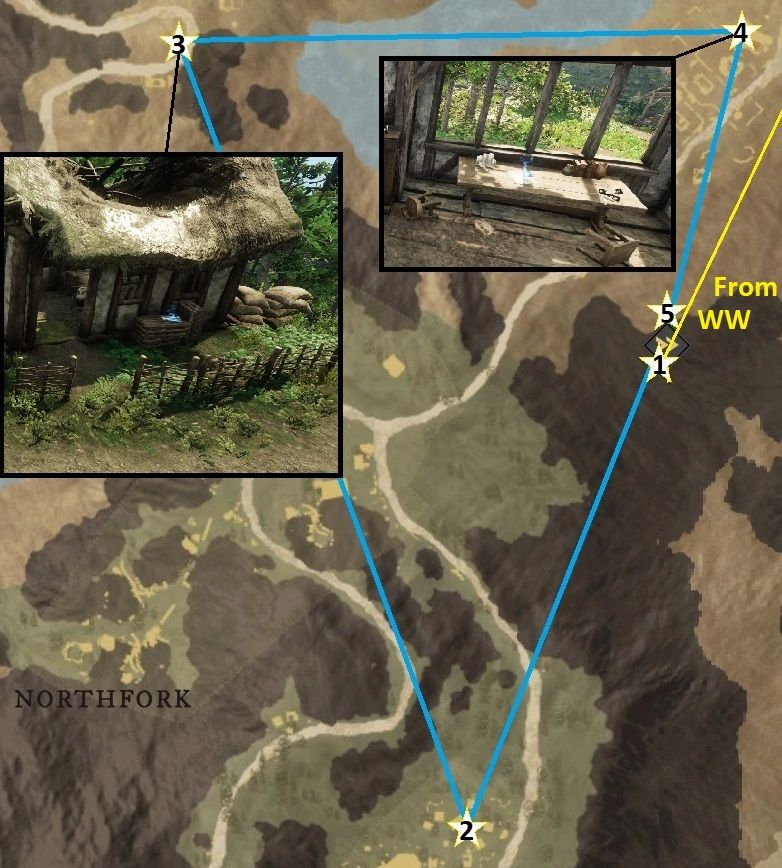
- Fast Travel to the northern Spirit Shrine in First Light.
- Run southwest to Letum's Pick and kill 3 Corrupted to get the
 Frasco de Sangue Corrompido items you need - just pick off the guys around the east edge.
 - Go northwest to Clearwater Bend, and grab the lore pages on crates outside the unburned houses (one is just extra XP, Common Thread is for [quest_0902_0501_discardedmemories]). Kill Withered for
 Têxteis de Alta Qualidade.
 - Head east to Campbell's Rest, go to the 2nd floor of the largest house to get the 2nd lore page needed, killing Withered as you go for
 Naco de Carne Definhada items. Collect the well next to the house, and chests around the area for
  Fio de Alta Qualidade.
 - Run south to the Spirit Shrine and fast travel back to First Light.
Turn everything in (except [quest_0602_0503_warpandweft], that can wait until you're in Windsward next time), and accept [quest_0905_0305_evolutioncorruption_pt3], and [quest_0902_0502_errorofways]. Accept any available Town Projects involving boars, wolves, turkeys, or rawhide/hemp (100 or less). Accept Town Projects or Faction Missions for Nyhart's Anchorage.
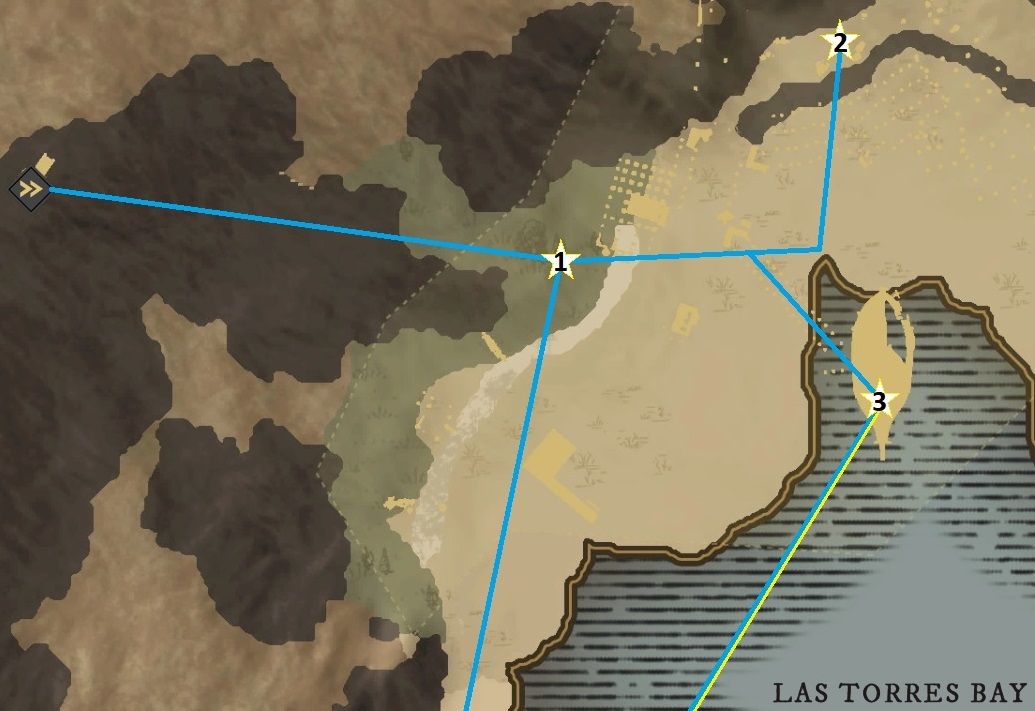
- Run or Fast Travel north to Nyhart's Anchorage (if you run, you can also quickly pick up [quest_9927_0102_visionsofinvaders] on the coastline, but we'll grab it later too). As you roam around, kill Drowned for
 Cartas de Navegação and
  Frasco de Sangue de Pirata items. If you head straight to the named enemies (see next steps), you'lld get what you need on the way.
 - Staying on the ground level, run under the docks and into the cave, and kill Contramestre Ambrose.
- Head back outside, get on the upper level, and cross the bridge to the large ship. Upstairs on the boat, in the captain's quarters on the south end, kill Quartel-mestre Zebulon. Go downstairs into the bottom deck, just underneath where Zebulon was, and gather the Stored Supplies. Return to First Light with whatever method you have available (running, Inn, Spirit Shrine).
Turn everything in, and accept [quest_0902_0503_abandonedresearch] and [quest_0903_0401_skininthegame]. Accept any available Town Projects involving boars, lynx, rabbits, or rawhide/hemp (100 or less). Accept Town Projects or Faction Missions for Saircor Bridge or Saircor.
Make sure your Skinning skill is at least 25 - you'll need it to skin the Warden Lynx. There's lots of boars and wolves around town to hone your skills on, if needed.
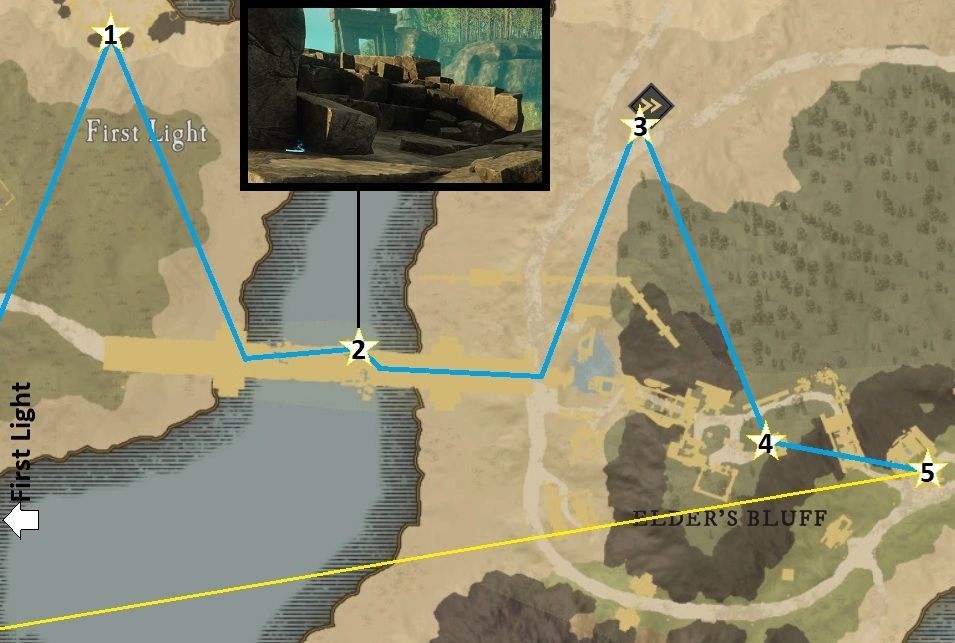
- On the way out of town, run northeast and grab [quest_9927_0102_visionsofinvaders] (unlocked at 16). If you're not quite strong enough to take on the level 18-20 Varangians, just run quickly into the tent, grab the quest, and leave. We'll turn this in when we return from Saircor.
- On the bridge, you'll defeat and pass 2 Silogista Insondável (armored Ancient Guardians with spears). Just before the 3rd, in the same section as a Provisions chest, look behind a stone block on the left (north) side of the bridge for the note you need for your quest. See map.
- Upon crossing the bridge you'll be in Elder's Bluff. Veer north and swing by the Spirit Shrine up there to unlock it. Then head back down into Saircor, keeping an eye out for Brown Rabbits and Warden Lynx. Most of the Warden Lynx are just north of the main area. Kill and skin them to complete the related tasks.
- Stop by a raised platform for the next lore page needed.
- The [quest_0902_0503_abandonedresearch] quest marker doesn't show you where the Tutelary Regent is, so see map above. After that, continue killing skeletons to complete all objectives, then return to First Light, by way of Shrine, Inn, or good old fashioned feet.
Turn everything in, and pick up [quest_0905_0306_brightazothflame] and [quest_0904_0302_snuffingcandle]. Accept any available Town Projects involving boars, lynx, rabbits, or rawhide/hemp (100 or less). Accept Town Projects or Faction Missions for Elafry Pyrgo.
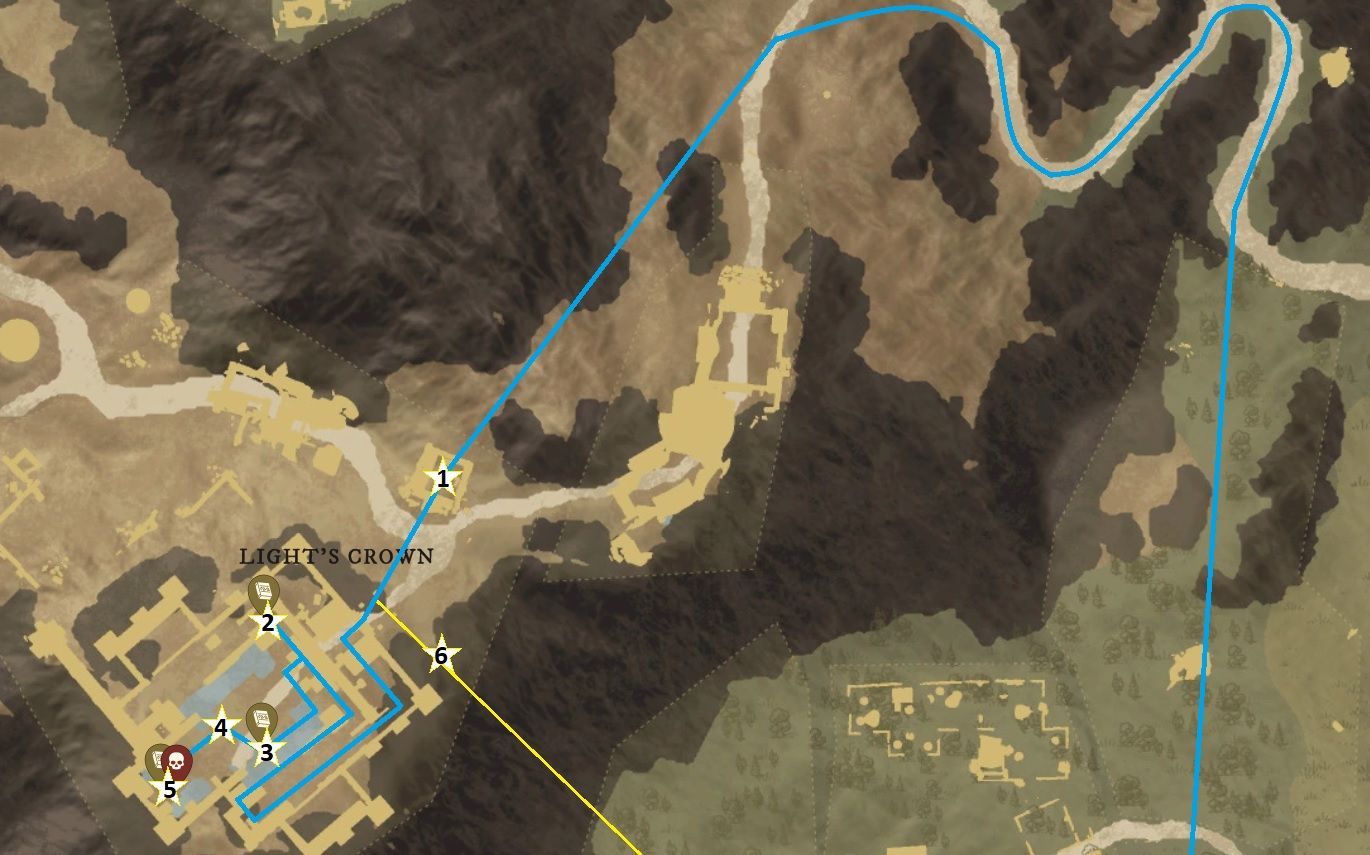
- Had north to the mountain road, then west to Elafry Pyrgo.
- Follow the path to the first lore page, and read it, killing as you go and grabbing chests.
- Head inside, and turn left, going up to the higher level. Grab the second lore page from the stone railing overlooking the Brightbeacon Regent.
- Kill the Brightbeacon Regent down below.
- Kill the Kisare, o Capataz in the next room. Behind the Kisare, o Capataz, collect the last lore page.
- Return to First Light by foot, it's a quick run if you jump off the cliff here.
Turn everything in, and pick up [quest_0902_0601_dispatchtothefront] and [quest_0910_0201_zoneofcontrol]. Accept any available Town Projects involving boars, wolves, rabbits, or rawhide/hemp (100 or less). Accept Town Projects or Faction Missions for Coffman's Redoubt or Nyhart's Anchorage.
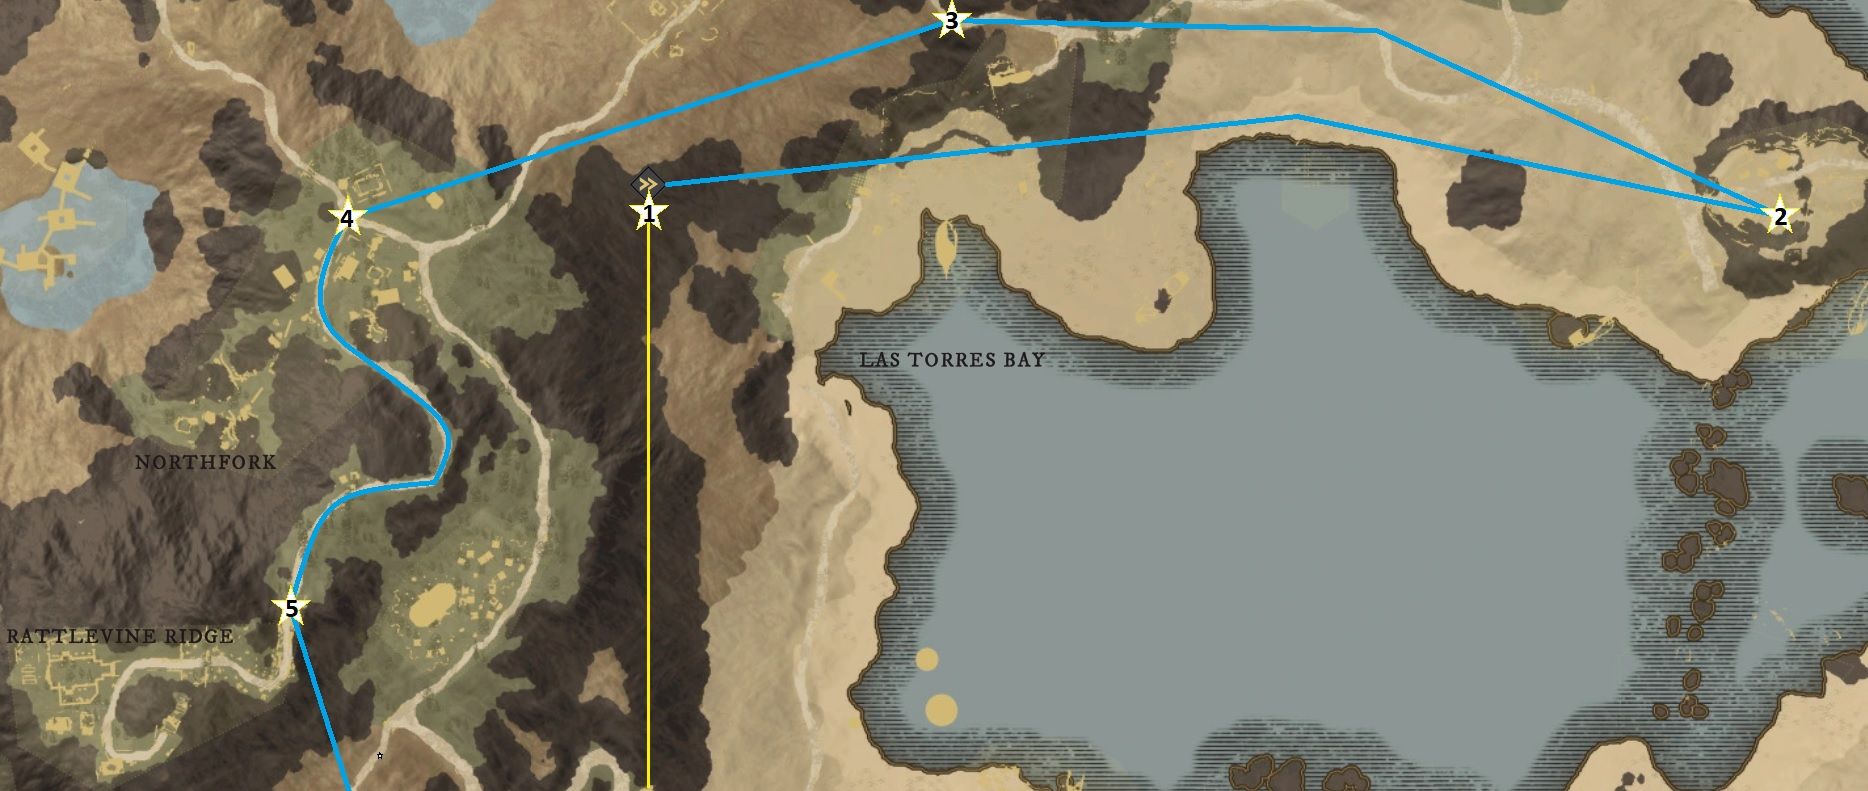
- If you can, use the Spirit Shrine to Fast Travel to the northern part of the territory.
- Head east to Coffman's Redoubt. You can run right through Nyhart's Anchorage if you'd like. Head through the camp interacting with the cannons and killing pirates, being sure to grab the lore page needed - it's on the second floor of the house on the ground level.
- When done, you're sent back to Letum's Pick. You might as well hoof it there. If you didn't like running through Nyhart's Anchorage, the path shown here can be a bit easier.
- The first set of footprints are here. They will move as you interact with them, making you follow them to Sleepy Tallow. Make sure you don't miss any.
- Once you collect the last one at the entrance to Sleepy Tallow, head back to town. It's a short run if you jump off the cliffs.
Turn everything in, and pick up [quest_0904_0303_curseebonyhawk] and [quest_0905_0307_evolutioncorruption_pt4]. Accept any available Town Projects involving boars, wolves, rabbits, or rawhide/hemp (100 or less). Accept Town Projects or Faction Missions for Hilltop Encampment or Sleepy Tallow.
Make sure your Skinning skill is at least 40 - you'll need it to skin the Ebony Wolves. There's lots of boars and wolves around town to hone your skills on, if needed.
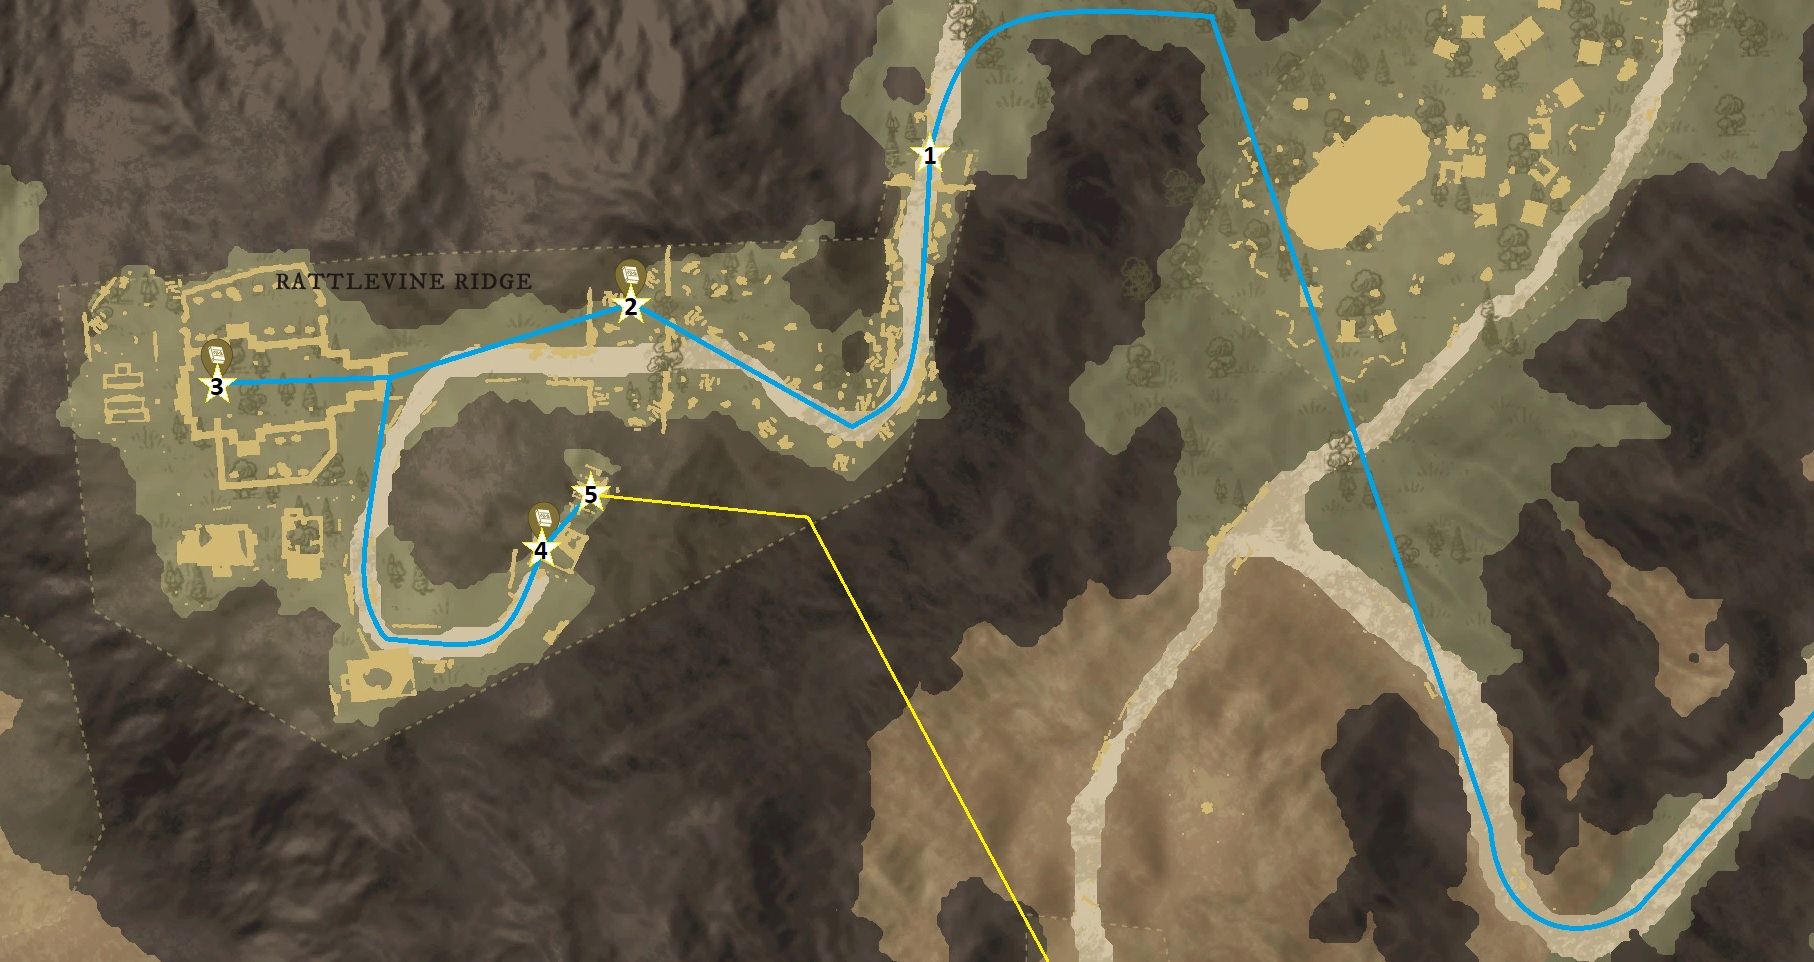
- Head north to the mountain path and run through Hilltop Encampment, turning left to get to Sleepy Tallow.
- Run through the area, killing Ebony Hawk Faminegeists for
 Ectoplasma Espectral, and stop at this gravestone for the first lore page.
 - Continue on, now killing and skinning Ebony Wolves for
 Medalhão do Marinheiros. Find the second lore page in the church, on the altar area.
 - Follow the path up the hill, continue to kill wolves. Find the last lore page in the last house, on a desk near the front door.
- Kill Primeiro Imediato Klaus and head back to First Light. No need to waste an Inn cooldown, it's a short walk.
Turn everything in, including [quest_0905_0701_artificersgratitude] and [quest_0904_0801_reassuringmagistrate] that you obtain right after turning in your other quests.
And congratulations! You're done in First Light!
If you enjoyed this guide, please join me in Part 2, where we'll venture to Everfall and Monarch's Bluffs, advancing the Main Story and getting our ![]() Bastão de Azoth (T1), along with loads of XP! Thanks for reading!
Bastão de Azoth (T1), along with loads of XP! Thanks for reading!
- Alice
About the author


All First Light quests have been removed as of the Brimstone Sands update, 18th October 2022.